> ## Documentation Index
> Fetch the complete documentation index at: https://wb-21fd5541-docs-1778-mysql-updates.mintlify.site/llms.txt
> Use this file to discover all available pages before exploring further.
> Learn how to use W&B for Model Management
# Tutorial: Use W&B for model management
The following walkthrough shows you how to log a model to W\&B. By the end of the walkthrough you will:
* Create and train a model with the MNIST dataset and the Keras framework.
* Log the model that you trained to a W\&B project
* Mark the dataset used as a dependency to the model you created
* Link the model to the W\&B Registry.
* Evaluate the performance of the model you link to the registry
* Mark a model version ready for production.
- Copy the code snippets in the order presented in this guide.
- Code not unique to the Model Registry are hidden in collapsible cells.
## Setting up
Before you get started, import the Python dependencies required for this walkthrough:
```python theme={null}
import wandb
import numpy as np
from tensorflow import keras
from tensorflow.keras import layers
from wandb.integration.keras import WandbMetricsLogger
from sklearn.model_selection import train_test_split
```
Provide your W\&B entity to the `entity` variable:
```python theme={null}
entity = ""
```
### Create a dataset artifact
First, create a dataset. The proceeding code snippet creates a function that downloads the MNIST dataset:
```python theme={null}
def generate_raw_data(train_size=6000):
eval_size = int(train_size / 6)
(x_train, y_train), (x_eval, y_eval) = keras.datasets.mnist.load_data()
x_train = x_train.astype("float32") / 255
x_eval = x_eval.astype("float32") / 255
x_train = np.expand_dims(x_train, -1)
x_eval = np.expand_dims(x_eval, -1)
print("Generated {} rows of training data.".format(train_size))
print("Generated {} rows of eval data.".format(eval_size))
return (x_train[:train_size], y_train[:train_size]), (
x_eval[:eval_size],
y_eval[:eval_size],
)
# Create dataset
(x_train, y_train), (x_eval, y_eval) = generate_raw_data()
```
Next, upload the dataset to W\&B. To do this, create an [artifact](/models/artifacts/) object and add the dataset to that artifact.
```python theme={null}
project = "model-registry-dev"
model_use_case_id = "mnist"
job_type = "build_dataset"
# Initialize a W&B run
run = wandb.init(entity=entity, project=project, job_type=job_type)
# Create W&B Table for training data
train_table = wandb.Table(data=[], columns=[])
train_table.add_column("x_train", x_train)
train_table.add_column("y_train", y_train)
train_table.add_computed_columns(lambda ndx, row: {"img": wandb.Image(row["x_train"])})
# Create W&B Table for eval data
eval_table = wandb.Table(data=[], columns=[])
eval_table.add_column("x_eval", x_eval)
eval_table.add_column("y_eval", y_eval)
eval_table.add_computed_columns(lambda ndx, row: {"img": wandb.Image(row["x_eval"])})
# Create an artifact object
artifact_name = "{}_dataset".format(model_use_case_id)
artifact = wandb.Artifact(name=artifact_name, type="dataset")
# Add wandb.WBValue obj to the artifact.
artifact.add(train_table, "train_table")
artifact.add(eval_table, "eval_table")
# Persist any changes made to the artifact.
artifact.save()
# Tell W&B this run is finished.
run.finish()
```
Storing files (such as datasets) to an artifact is useful in the context of logging models because you lets you track a model's dependencies.
## Train a model
Train a model with the artifact dataset you created in the previous step.
### Declare dataset artifact as an input to the run
Declare the dataset artifact you created in a previous step as the input to the W\&B run. This is particularly useful in the context of logging models because declaring an artifact as an input to a run lets you track the dataset (and the version of the dataset) used to train a specific model. W\&B uses the information collected to create a [lineage map](./model-lineage).
Use the `use_artifact` API to both declare the dataset artifact as the input of the run and to retrieve the artifact itself.
```python theme={null}
job_type = "train_model"
config = {
"optimizer": "adam",
"batch_size": 128,
"epochs": 5,
"validation_split": 0.1,
}
# Initialize a W&B run
run = wandb.init(project=project, job_type=job_type, config=config)
# Retrieve the dataset artifact
version = "latest"
name = "{}:{}".format("{}_dataset".format(model_use_case_id), version)
artifact = run.use_artifact(artifact_or_name=name)
# Get specific content from the dataframe
train_table = artifact.get("train_table")
x_train = train_table.get_column("x_train", convert_to="numpy")
y_train = train_table.get_column("y_train", convert_to="numpy")
```
For more information about tracking the inputs and output of a model, see [Create model lineage](./model-lineage) map.
### Define and train model
For this walkthrough, define a 2D Convolutional Neural Network (CNN) with Keras to classify images from the MNIST dataset.
Train CNN on MNIST data
```python theme={null}
# Store values from our config dictionary into variables for easy accessing
num_classes = 10
input_shape = (28, 28, 1)
loss = "categorical_crossentropy"
optimizer = run.config["optimizer"]
metrics = ["accuracy"]
batch_size = run.config["batch_size"]
epochs = run.config["epochs"]
validation_split = run.config["validation_split"]
# Create model architecture
model = keras.Sequential(
[
layers.Input(shape=input_shape),
layers.Conv2D(32, kernel_size=(3, 3), activation="relu"),
layers.MaxPooling2D(pool_size=(2, 2)),
layers.Conv2D(64, kernel_size=(3, 3), activation="relu"),
layers.MaxPooling2D(pool_size=(2, 2)),
layers.Flatten(),
layers.Dropout(0.5),
layers.Dense(num_classes, activation="softmax"),
]
)
model.compile(loss=loss, optimizer=optimizer, metrics=metrics)
# Generate labels for training data
y_train = keras.utils.to_categorical(y_train, num_classes)
# Create training and test set
x_t, x_v, y_t, y_v = train_test_split(x_train, y_train, test_size=0.33)
```
Next, train the model:
```python theme={null}
# Train the model
model.fit(
x=x_t,
y=y_t,
batch_size=batch_size,
epochs=epochs,
validation_data=(x_v, y_v),
callbacks=[WandbCallback(log_weights=True, log_evaluation=True)],
)
```
Finally, save the model locally on your machine:
```python theme={null}
# Save model locally
path = "model.h5"
model.save(path)
```
## Log and link a model to the Model Registry
Use the [`link_model`](/models/ref/python/experiments/run#link_model) API to log model one ore more files to a W\&B run and link it to the [W\&B Model Registry](./).
```python theme={null}
path = "./model.h5"
registered_model_name = "MNIST-dev"
run.link_model(path=path, registered_model_name=registered_model_name)
run.finish()
```
W\&B creates a registered model for you if the name you specify for `registered-model-name` does not already exist.
See [`link_model`](/models/ref/python/experiments/run#link_model) in the API Reference guide for optional parameters.
## Evaluate the performance of a model
It is common practice to evaluate the performance of a one or more models.
First, get the evaluation dataset artifact stored in W\&B in a previous step.
```python theme={null}
job_type = "evaluate_model"
# Initialize a run
run = wandb.init(project=project, entity=entity, job_type=job_type)
model_use_case_id = "mnist"
version = "latest"
# Get dataset artifact, mark it as a dependency
artifact = run.use_artifact(
"{}:{}".format("{}_dataset".format(model_use_case_id), version)
)
# Get desired dataframe
eval_table = artifact.get("eval_table")
x_eval = eval_table.get_column("x_eval", convert_to="numpy")
y_eval = eval_table.get_column("y_eval", convert_to="numpy")
```
Download the [model version](./model-management-concepts#model-version) from W\&B that you want to evaluate. Use the `use_model` API to access and download your model.
```python theme={null}
alias = "latest" # alias
name = "mnist_model" # name of the model artifact
# Access and download model. Returns path to downloaded artifact
downloaded_model_path = run.use_model(name=f"{name}:{alias}")
```
Load the Keras model and compute the loss:
```python theme={null}
model = keras.models.load_model(downloaded_model_path)
y_eval = keras.utils.to_categorical(y_eval, 10)
(loss, _) = model.evaluate(x_eval, y_eval)
score = (loss, _)
```
Finally, log the loss metric to the W\&B run:
```python theme={null}
# # Log metrics, images, tables, or any data useful for evaluation.
run.log(data={"loss": (loss, _)})
```
## Promote a model version
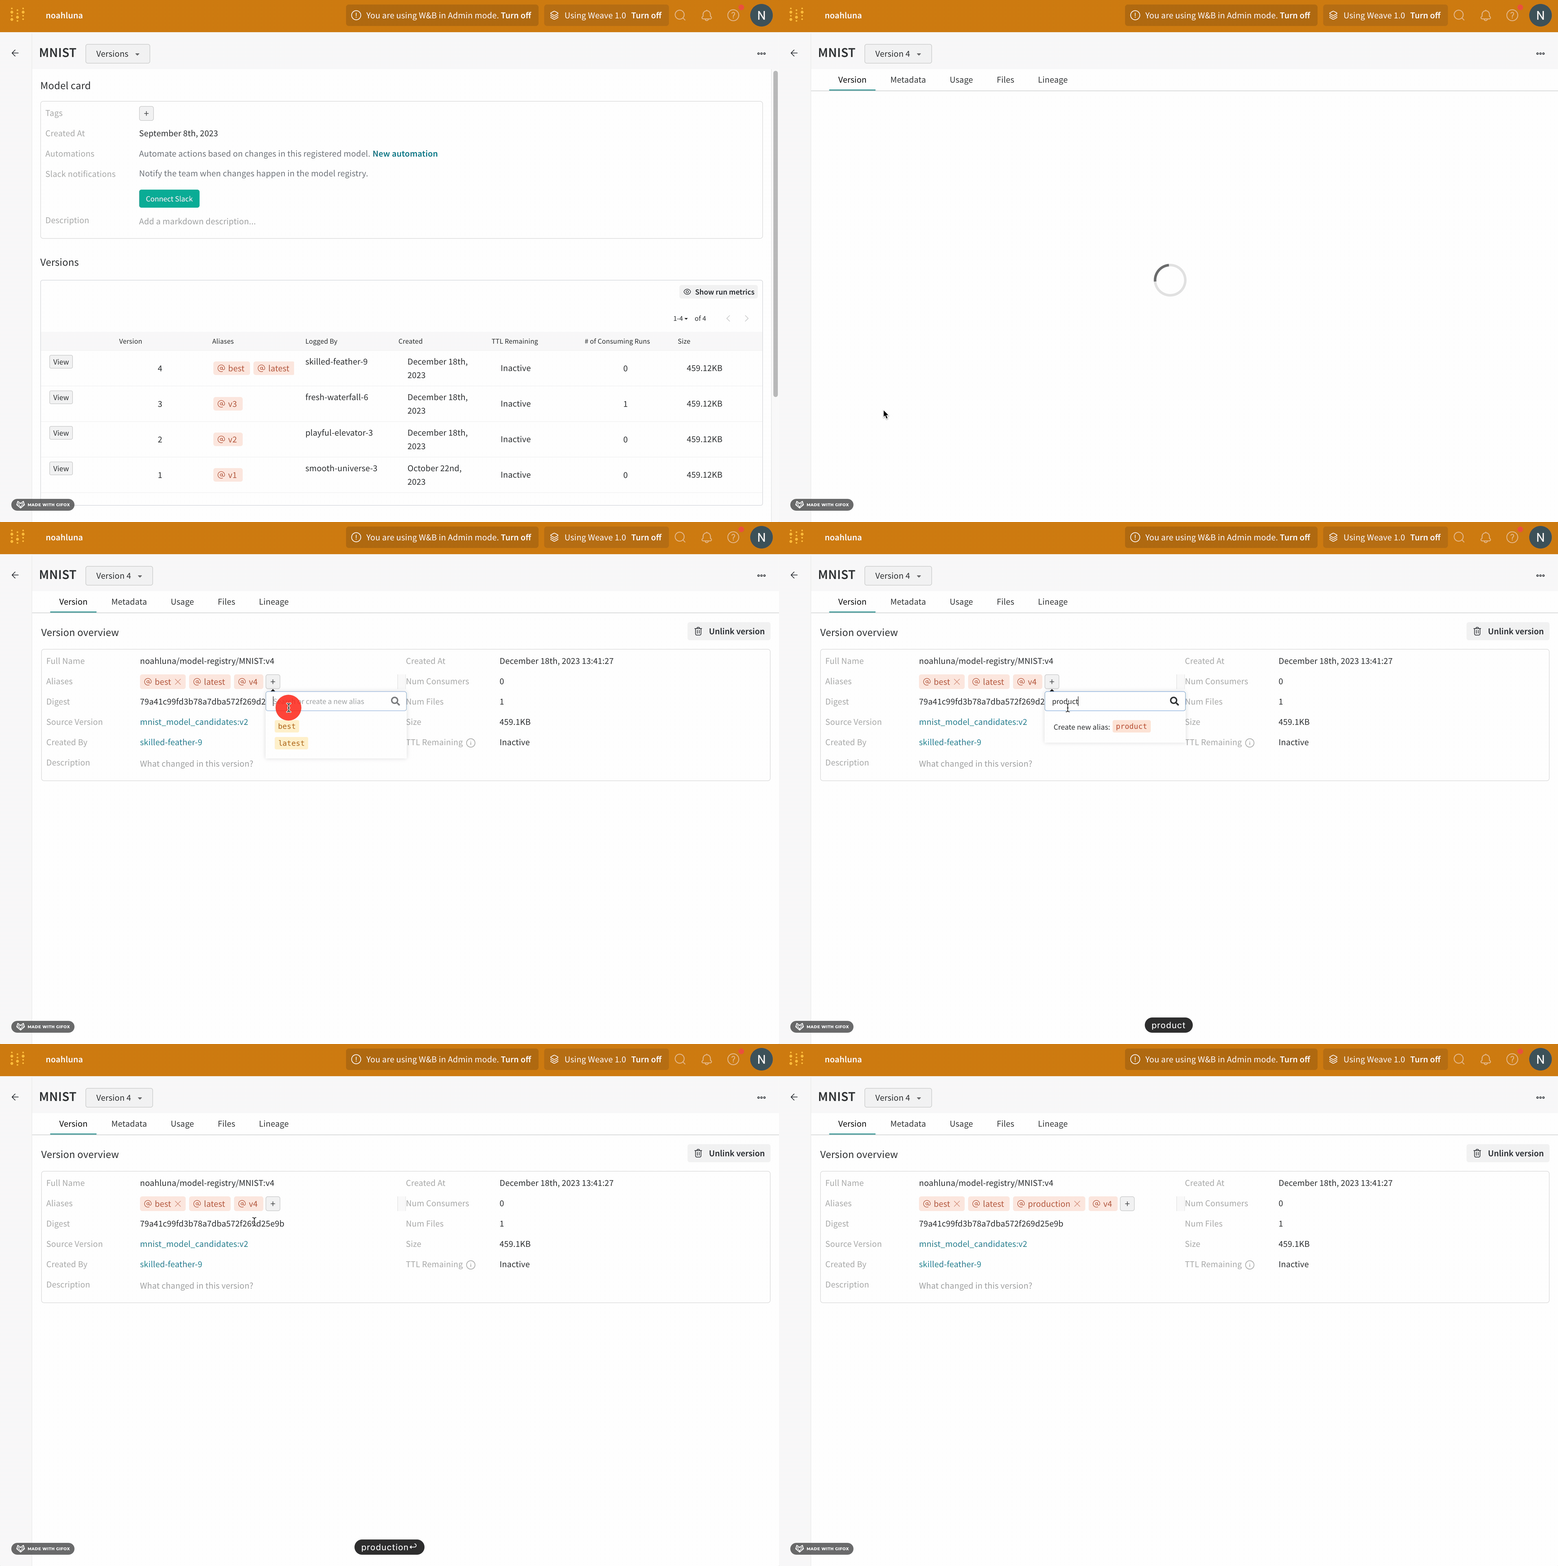
Mark a model version ready for the next stage of your machine learning workflow with a [*model alias*](./model-management-concepts#model-alias). Each registered model can have one or more model aliases. A model alias can only belong to a single model version at a time.
For example, suppose that after evaluating a model's performance, you are confident that the model is ready for production. To promote that model version, add the `production` alias to that specific model version.
The `production` alias is one of the most common aliases used to mark a model as production-ready.
You can add an alias to a model version interactively with the W\&B App UI or programmatically with the Python SDK. The following steps show how to add an alias with the W\&B Model Registry:
1. Navigate to the [Model Registry](https://wandb.ai/registry/model).
2. Click **View details** next to the name of your registered model.
3. Within the **Versions** section, click the **View** button next to the name of the model version you want to promote.
4. Next to the **Aliases** field, click the plus icon (**+**).
5. Type in `production` into the field that appears.
6. Press Enter on your keyboard.